Azure Functions & wkhtmltopdf: Convert HTML to PDF
- Arjav Dave
- Mar 22, 2021
- 10 min read

Updated: Jul 17, 2022
We are going to use Azure Functions & wkhtmltopdf tool to generate a PDF file from an HTML file. You might want to create a PDF file for a great many reasons e.g. generate invoices for sales, medical reports for your patients, insurance forms for your clients etc. There are a few ways to do this.
Firstly, you can use Adobe‘s fill and sign tool to fill out forms, but this mostly requires a human interaction and hence it’s not scalable and not convenient.
Second option is you directly create a pdf file. Based on the platform you are working on you will have tools to directly create a pdf file. If it’s a very simple pdf you can take this approach.
This brings us to our final and most convenient option. wkhtmltopdf is a really great tool to convert your HTML to PDF. Since it is free, open source and can be compiled for almost all platforms it is our best choice.
Prerequisites
Microsoft VS Code
An account on Azure Portal
Linux Basic (B1) App Service Plan. If you already have a Windows Basic (B1) App Service Plan you can use that.
Azure Storage Account.
Azure Functions
Since converting a HTML to PDF is a time consuming task we shouldn’t run it on our main web server. Otherwise it may start blocking other important requests. Azure Functions are the best way to delegate such tasks.
In order to create a function you will first need to install Azure Functions on your machine. Based on your OS install the Azure Functions Core Tools. Once installed open your command line tool to fire the below command. html2pdf is your project’s name. You can replace it with any name.
func init html2pdf On executing the command it will ask for a worker runtime. Here select 1. dotnet since being a Microsoft’s product it provides great support for dotnet. This will generate a folder name html2pdf in your current directory. Since Visual Studio Code allows to directly publish to Azure Functions we will use it to code and deploy.
After you open your project in VS Code create a file named Html2Pdf.cs. Azure Functions provide a wide variety of triggers to execute the function. For now we will start with HTTP trigger i.e. the function can be called directly via http protocol. In our newly created file paste the below content.
using System;
using Microsoft.Azure.WebJobs;
using Microsoft.Azure.WebJobs.Extensions.Http;
using Microsoft.Extensions.Logging;
namespace Html2Pdf
{
    public class Html2Pdf
    {
        // The name of the function
        [FunctionName("Html2Pdf")]

        // The first arugment tells that the functions can be triggerd by a POST HTTP request.
        // The second argument is mainly used for logging information, warnings or errors
        public void Run([HttpTrigger(AuthorizationLevel.Function, "POST")] Html2PdfRequest Request, ILogger Log)
        {
        }
    }
}
We have created a skeleton in which we will now fill in the details. As you might have noticed the type of request variable is Html2PdfRequest. So let’s create a model Html2PdfRequest.cs class as below.
namespace Html2Pdf
{
    public class Html2PdfRequest
    {
        // The HTML content that needs to be converted.
        public string HtmlContent { get; set; }

        // The name of the PDF file to be generated
        public string PDFFileName { get; set; }
    }
}
DinkToPdf
In order to invoke wkhtmltopdf from our managed code a technology called P/Invoke is used. In short P/Invoke allows us to access structs, callbacks and functions in unmanaged libraries. There is a nice P/Invoke wrapper named DinkToPdf to allow us to abstract away the technicalities.
You can add DinkToPdf to your project via nuget. Simply run the command from your root folder.
dotnet add package DinkToPdf --version 1.0.8 Time to add some code at the top of our class Html2Pdf.
// Read more about converter on: https://github.com/rdvojmoc/DinkToPdf
// For our purposes we are going to use SynchronizedConverter
IPdfConverter pdfConverter = new SynchronizedConverter(new PdfTools());
// A function to convert html content to pdf based on the configuration pased as arguments
// Arguments:
// HtmlContent: the html content to be converted
// Width: the width of the pdf to be created. e.g. "8.5in", "21.59cm" etc.
// Height: the height of the pdf to be created. e.g. "11in", "27.94cm" etc.
// Margins: the margis around the content
// DPI: The dpi is very important when you want to print the pdf.
// Returns a byte array of the pdf which can be stored as a file
private byte[] BuildPdf(string HtmlContent, string Width, string Height, MarginSettings Margins, int? DPI = 180)
{
  // Call the Convert method of SynchronizedConverter "pdfConverter"
  return pdfConverter.Convert(new HtmlToPdfDocument()
            {
                // Set the html content
                Objects =
                {
                    new ObjectSettings
                    {
                        HtmlContent = HtmlContent
                    }
                },
                // Set the configurations
                GlobalSettings = new GlobalSettings
                {
                    // PaperKind.A4 can also be used instead PechkinPaperSize
                    PaperSize = new PechkinPaperSize(Width, Height),
                    DPI = DPI,
                    Margins = Margins
                }
            });
}
I have added inline comments so as to be self explanatory. If you have any questions you can ask me in the comments section below. Let’s call the above created function from our Run method.
// PDFByteArray is a byte array of pdf generated from the HtmlContent
var PDFByteArray = BuildPdf(Request.HtmlContent, "8.5in", "11in", new MarginSettings(0, 0, 0,0));
Once the byte array is generated let’s store that as a blob in Azure Storage. Before you upload the blob, do create a container. Once you do that add the below code after PDFByteArray.
// The connection string of the Storage Account to which our PDF file will be uploaded
// Make sure to replace with your connection string.
var StorageConnectionString = "DefaultEndpointsProtocol=https;AccountName=<YOUR ACCOUNT NAME>;AccountKey=<YOUR ACCOUNT KEY>;EndpointSuffix=core.windows.net";
// Generate an instance of CloudStorageAccount by parsing the connection string
var StorageAccount = CloudStorageAccount.Parse(StorageConnectionString);
// Create an instance of CloudBlobClient to connect to our storage account
CloudBlobClient BlobClient = StorageAccount.CreateCloudBlobClient();
// Get the instance of CloudBlobContainer which points to a container name "pdf"
// Replace your own container name
CloudBlobContainer BlobContainer = BlobClient.GetContainerReference("pdf");
// Get the instance of the CloudBlockBlob to which the PDFByteArray will be uploaded
CloudBlockBlob Blob = BlobContainer.GetBlockBlobReference(Request.PDFFileName);
// Upload the pdf blob
await Blob.UploadFromByteArrayAsync(PDFByteArray, 0, PDFByteArray.Length);
You will see some errors and warning after you add this code. For that firstly, add the missing import statements. Secondly, change the return type from void to async Task for the Run function. Here is what the final Html2Pdf.cs file will look like.
using Microsoft.Azure.WebJobs;
using Microsoft.Azure.WebJobs.Extensions.Http;
using Microsoft.Extensions.Logging;
using DinkToPdf;
using IPdfConverter = DinkToPdf.Contracts.IConverter;
using Microsoft.WindowsAzure.Storage;
using Microsoft.WindowsAzure.Storage.Blob;
using System.Threading.Tasks;
namespace Html2Pdf
{
    public class Html2Pdf
    {
        // Read more about converter on: https://github.com/rdvojmoc/DinkToPdf
        // For our purposes we are going to use SynchronizedConverter
        IPdfConverter pdfConverter = new SynchronizedConverter(new PdfTools());
        // A function to convert html content to pdf based on the configuration pased as arguments
        // Arguments:
        // HtmlContent: the html content to be converted
        // Width: the width of the pdf to be created. e.g. "8.5in", "21.59cm" etc.
        // Height: the height of the pdf to be created. e.g. "11in", "27.94cm" etc.
        // Margins: the margis around the content
        // DPI: The dpi is very important when you want to print the pdf.
        // Returns a byte array of the pdf which can be stored as a file
        private byte[] BuildPdf(string HtmlContent, string Width, string Height, MarginSettings Margins, int? DPI = 180)
        {
            // Call the Convert method of SynchronizedConverter "pdfConverter"
            return pdfConverter.Convert(new HtmlToPdfDocument()
            {
                // Set the html content
                Objects =
                {
                    new ObjectSettings
                    {
                        HtmlContent = HtmlContent
                    }
                },
                // Set the configurations
                GlobalSettings = new GlobalSettings
                {
                    // PaperKind.A4 can also be used instead of width & height
                    PaperSize = new PechkinPaperSize(Width, Height),
                    DPI = DPI,
                    Margins = Margins
                }
            });
        }
        // The name of the function
        [FunctionName("Html2Pdf")]
        // The first arugment tells that the functions can be triggerd by a POST HTTP request.
        // The second argument is mainly used for logging information, warnings or errors
        public async Task Run([HttpTrigger(AuthorizationLevel.Function, "POST")] Html2PdfRequest Request, ILogger Log)
        {
            // PDFByteArray is a byte array of pdf generated from the HtmlContent
            var PDFByteArray = BuildPdf(Request.HtmlContent, "8.5in", "11in", new MarginSettings(0, 0, 0, 0));
            // The connection string of the Storage Account to which our PDF file will be uploaded
            var StorageConnectionString = "DefaultEndpointsProtocol=https;AccountName=<YOUR ACCOUNT NAME>;AccountKey=<YOUR ACCOUNT KEY>;EndpointSuffix=core.windows.net";

            // Generate an instance of CloudStorageAccount by parsing the connection string
            var StorageAccount = CloudStorageAccount.Parse(StorageConnectionString);
            // Create an instance of CloudBlobClient to connect to our storage account
            CloudBlobClient BlobClient = StorageAccount.CreateCloudBlobClient();
            // Get the instance of CloudBlobContainer which points to a container name "pdf"
            // Replace your own container name
            CloudBlobContainer BlobContainer = BlobClient.GetContainerReference("pdf");

            // Get the instance of the CloudBlockBlob to which the PDFByteArray will be uploaded
            CloudBlockBlob Blob = BlobContainer.GetBlockBlobReference(Request.PDFFileName);

            // Upload the pdf blob
            await Blob.UploadFromByteArrayAsync(PDFByteArray, 0, PDFByteArray.Length);
        }
    }
}
This concludes the coding part.
wkhtmltopdf
We will still need to add wkhtmltopdf library in our project. There are a few caveats when selecting a particular Azure App Plan. Based on the Plan, we will have to get the wkhtmltopdf library. For our purposes we have selected Linux Basic (B1) App Service Plan since Windows Basic (B1) App Service Plan is 5 times costlier.
At the time of writing this blog Azure App Service Plan was using Debian 10 with amd64 architecture. Good for us, DinkToPdf provides precompiled libraries for Linux, Windows & MacOS. Download the .so library for Linux and put it in your project’s root folder. I am working on MacOS so I downloaded libwkhtmltox.dylib as well. If you are using Windows or if you have hosted the Azure Functions on Windows App Service Plan you must download the libwkhtmltox.dll. Here is how our project structure will look like.

Project Structure
When we create a build we need to include the .so library. In order to do that open your csproj file and add the below content to the ItemGroup.
<None Update="./libwkhtmltox.so">
    <CopyToOutputDirectory>PreserveNewest</CopyToOutputDirectory>
    <CopyToPublishDirectory>Always</CopyToPublishDirectory>
</None>
Here is the whole csproj file:
<Project Sdk="Microsoft.NET.Sdk">
  <PropertyGroup>
    <TargetFramework>netcoreapp3.1</TargetFramework>
    <AzureFunctionsVersion>v3</AzureFunctionsVersion>
  </PropertyGroup>
  <ItemGroup>
    <PackageReference Include="DinkToPdf" Version="1.0.8" />
    <PackageReference Include="Microsoft.NET.Sdk.Functions" Version="3.0.11" />
  </ItemGroup>
  <ItemGroup>
    <None Update="host.json">
      <CopyToOutputDirectory>PreserveNewest</CopyToOutputDirectory>
    </None>
    <None Update="local.settings.json">
      <CopyToOutputDirectory>PreserveNewest</CopyToOutputDirectory>
      <CopyToPublishDirectory>Never</CopyToPublishDirectory>
    </None>
    <None Update="./libwkhtmltox.so">
      <CopyToOutputDirectory>PreserveNewest</CopyToOutputDirectory>
      <CopyToPublishDirectory>Always</CopyToPublishDirectory>
    </None>
  </ItemGroup>
</Project>
Creating Azure Functions App
Before we deploy to Azure Functions we will have to create the Azure Functions in Azure Portal. You can go to Azure Portal and start creating the Azure Functions resource. You can follow the below screenshots for clarity.

Instance Details
In the below screenshot make sure to select or create at least Basic Plan here. Secondly, in the Operating System select Linux.
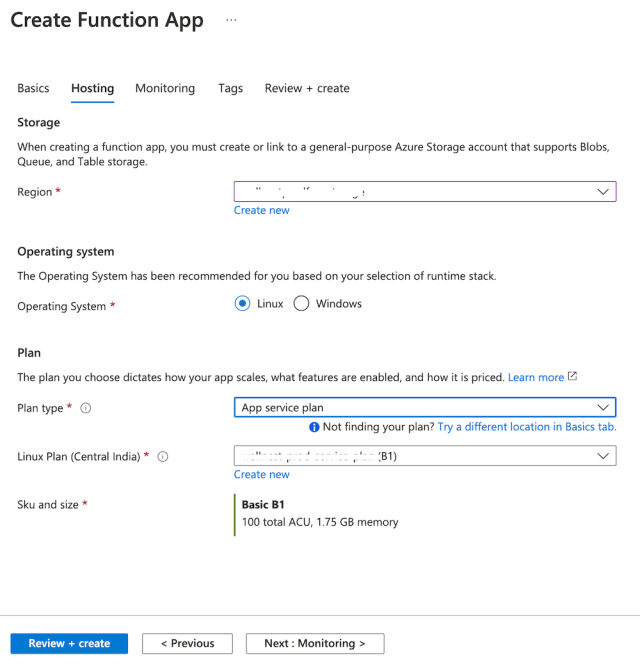
Plan Details
It’s good to have Application Insights since you will be able to see logs and monitor functions. Besides, it hardly costs anything. As shown in the screenshot below select Yes if you want to enable it.
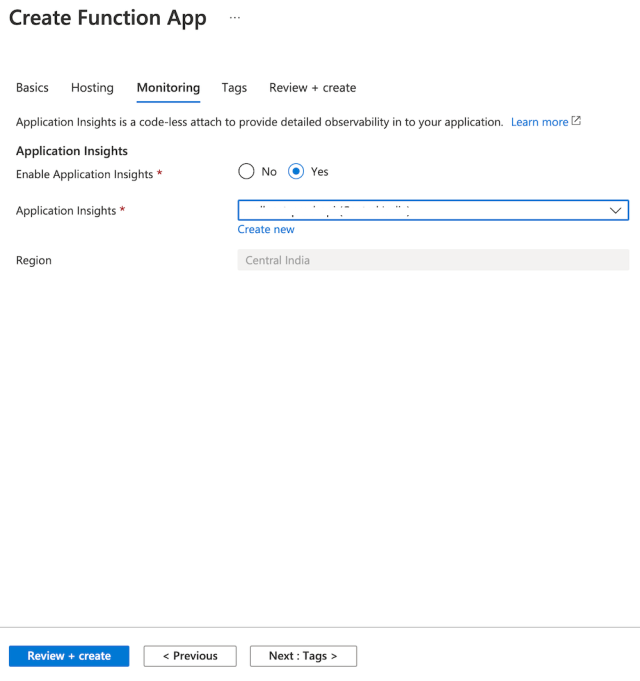
Application Insights
Select Next: Tags and again click Next and click Create to create your resource. It might take a few minutes to create the Azure Functions resource.
Deploying to Azure Functions
Once created we will deploy our code directly to Azure Functions via VS Code. For that you will have to go to the extensions and install the Azure Functions extension. With its help we will be able to login and manage Azure Functions.

Azure Functions in Marketplace
Once installed you will see Azure icon on the side bar. When clicked, it will open a panel with an option to Sign In to Azure.

Azure Functions Extension
Select Sign in to Azure which will open a browser where you can login with your account. Once logged in you can go back to VS Code and see the list of Azure Functions in your side panel.

List of Azure Functions
For me there are 4 function apps. Since you might have created just one it will show one. Time to deploy the app.
Press F1 to open a menu with a list of actions. Select Azure Functions: Deploy to Function App… which will open a list of Azure Functions to which you can deploy. Select our newly created Azure Funtions App. This will ask for a confirmation pop-up, so go ahead and deploy it. It will take a few minutes to deploy your App.
Configuring wkhtmltopdf
Once you have deployed to Azure Functions there is still one last thing to do. We will need to add libwkhtmltox.so to a proper location on our Azure Functions App. Login to Azure portal and navigate to our Azure Functions App. On the side panel search for SSH and click the Go button.
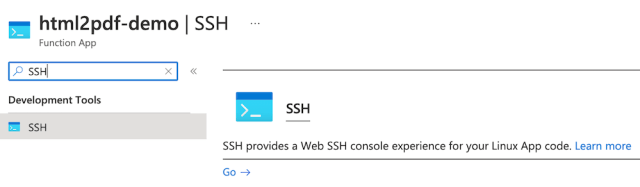
Search SSH for Azure Functions
This will open a SSH console in new tab. Our site is located at /home/site/wwwroot. So navigate to that folder by typing in the below command.
cd /home/site/wwwroot/bin When you execute ls command to view the contents of the file you won’t see the libwkhtmltox.so file. It is actually located at /home/site/wwwroot.
That is not the correct position. We need to copy it in the bin folder. For that execute the below command.
cp ../libwkhtmltox.so libwkhtmltox.so If you know a better way on how to include the file in the bin folder please suggest in the comment below.
That’s it!!! You have got a fully functional Azure Functions App. Time to call it from our demo dotnet project.
Invoking the Azure Function
All said and done we still need to test and call our function. Before we do that we need to get hold of Code which is required to call the Function. The Code is a secret that needs to be included to call the Function securely. To get the Code navigate to Azure Portal and open your Function App. In the side panel search for Functions.

Search Functions
You will see Html2Pdf in the list. Click on that function which will open the details view. In the side panel there will be an option for Function Keys. Select that option to view a hidden default Code already added for you.

Copy the code and keep that handy since it will be needed in the code. In order to test the function I have created a sample console app for you. Replace the base url and The code is as below:
using System;
using System.Net;
using System.Net.Http;
using System.Net.Http.Headers;
using System.Threading.Tasks;
using Newtonsoft.Json;
namespace Demo.ConsoleApp
{
    public class Program
    {
        public static async Task Main(string[] args)
        {
            string AzureFunctionsUrl = "https://<Your Base Url>/api/Html2Pdf?code=<Replace with your Code>";
            using (HttpClient client = new HttpClient())
            {
                var Request = new Html2PdfRequest
                {
                    HtmlContent = "<h1>Hello World</h1>",
                    PDFFileName = "hello-world.pdf"
                };
                string json = JsonConvert.SerializeObject(Request);
                var buffer = System.Text.Encoding.UTF8.GetBytes(json);
                var byteContent = new ByteArrayContent(buffer);
                byteContent.Headers.ContentType = new MediaTypeHeaderValue("application/json");
                using (HttpResponseMessage res = await client.PostAsync(AzureFunctionsUrl, byteContent))
                {
                    if (res.StatusCode != HttpStatusCode.NoContent)
                    {
                        throw new Exception("There was an error uploading the pdf");
                    }
                }
            }
        }
    }
    public class Html2PdfRequest
    {
        // The HTML content that needs to be converted.
        public string HtmlContent { get; set; }
        // The name of the PDF file to be generated
        public string PDFFileName { get; set; }
    }
}
Again the code should be pretty self explanatory. If you have any feedback or questions please ask in the comment section below. Once you run the above console app, it will create a hello-world.pdf file in your pdf container in Azure Storage.
Conclusion
That concludes our tutorial on how to convert HTML to PDF using Azure Functions. For any feedback, questions or blog topics you can leave a comment below. Subscribe to the newsletter for upcoming and exciting new tutorials.
Visit my blogs for more such tutorials.

Comments