Deploy Angular to AWS S3 with GitHub Actions
- Arjav Dave
- Sep 3, 2023
- 6 min read

Introduction
Continuous Deployment needs no introduction. It has multiple advantages over deploying things manually. Firstly, one can deploy things confidently without breaking things. Secondly, running automated tests guarantees the quality of work. Lastly, it provides security by storing the environment variables in the CD pipelines instead of storing them on local machines or worse in the source code (Don't do that!).
This tutorial will help create a Continuous Deployment pipeline using GitHub Actions. This pipeline will build and deploy an Angular application to the AWS S3 bucket.
Prerequisites
Before we move forward, set up an Angular GitHub repository with GitHub Actions enabled.
To enable GitHub Actions visit the Settings -> Actions -> General in your GitHub repository. Select the Allow all actions and reusable workflows and click the Save button.

The Actions tab should now be visible at the top.

Overview
Here is a brief overview of the article we'll be going through:
Create AWS S3 Bucket
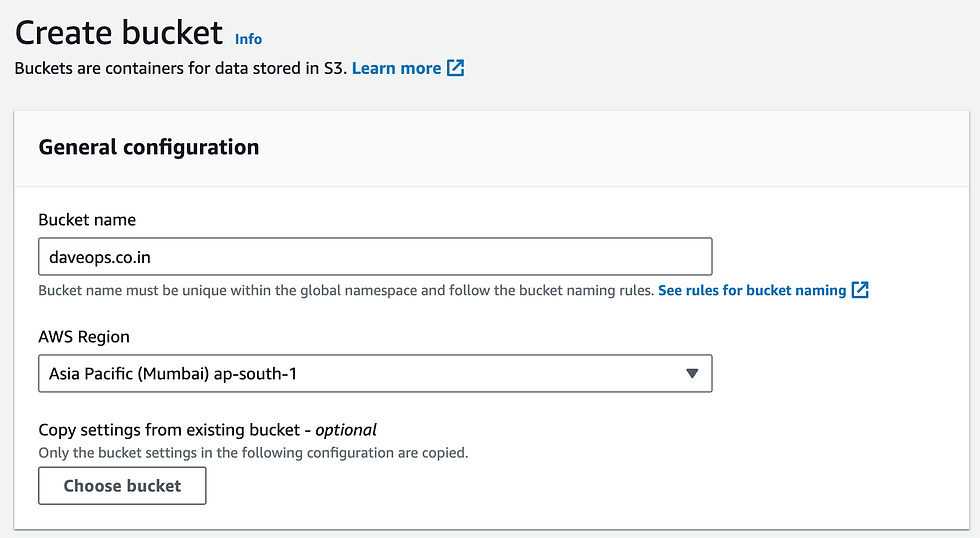
Let's create an S3 bucket to which the angular dist files will be pushed by the GitHub Actions.
To do so, visit this link, enter the name of the bucket, and click the "Create Bucket" button at the bottom. The other values are kept default. For tutorial purposes, I have added it as daveops.co.in.
Add IAM User
An IAM (Identity and Access Management) user allows access to GitHub Actions to upload objects to the bucket. You can learn more about IAM here.
Firstly, a policy with relevant permissions needs to be created. A policy is a set of rules and permissions which can be attached to an IAM user. You can read more about it here.
To create a policy visit this link and follow these steps:
Click on the "Create Policy" button on the top right.
Switch to the "JSON" tab instead of the "Visual" tab.
Replace the existing JSON with the below JSON content. The list of permissions is mentioned as needed by the user to upload objects to the bucket. The permissions also allow the ACL to be set for the objects.
Make sure to change the ARN to your bucket name.
{
  "Version": "2012-10-17",
  "Statement": [
    {
      "Sid": "VisualEditor0",
      "Effect": "Allow",
      "Action": [
        "s3:PutObject"
      ],
      "Resource": "arn:aws:s3:::daveops.co.in/*"
    }
  ]
}

Click "Next" and give a nice name and description of the policy.

Once done, click on the "Create Policy" button to create the policy.
After creating the policy, visit this link to start the process of creating an IAM user.
Firstly, enter a username of your choice and click "Next".

Secondly, in the permission checkbox select "Attach policies directly". Next, search for the name of the policy you just created. Select that policy and click "Next".


Finally, click "Create User" to create a new user.
Generate Security Credentials
The IAM User in itself is not very helpful. For GitHub Actions to be able to upload objects to the bucket, an Access Key and a Secret need to be generated.
To generate the security credentials follow the below steps:
Go to the list of users by opening the link.
Click on the newly created user to view its details.
Select the "Security Credentials" tab and scroll to the "Access Keys" section. Click on the "Create access keys" button which will open a use case page.

"Application running outside AWS" seems the most relevant use case. Select it and click "Next".

Enter a description tag and click "Create".
This will create the Access Key and Access Key Secret needed for the IAM user to upload objects to the AWS S3 Bucket. Store them temporarily in a safe place. In the next section, they will be stored securely in the GitHub Secrets after which you can discard them.
Add Secrets to GitHub
The credentials generated above are very important. Since they provide access to upload objects to the bucket we'll be storing them in the GitHub Secrets. Once stored they cannot be recovered/ viewed easily.
To begin, go to your GitHub repository and open Settings -> Security -> Actions

Here we will be storing 3 secrets.
Access Key
Access Key Secret
AWS Region
Next, click on "New repository secret" to add the first item i.e. Access Key.
Enter the Name as "AWS_ACCESS_KEY" and in the Secret paste in the value of your Access Key retrieved in the above step.

Similarly, add the AWS Secret Access Key with the name "AWS_SECRET_ACCESS_KEY" and the value from the previous section.

Lastly, add the region to which the user was added. This can be viewed by visiting the URL https://console.aws.amazon.com/iamv2/home#/users/. This URL will automatically redirect to the default region URL. For me, it was "https://us-east-1.console.aws.amazon.com/iamv2/home#/users/". Hence the AWS_REGION value will be us-east-1.

After adding all 3 secrets the Action Secrets will look like below. As mentioned above, it is now not possible to view the values of these secrets. But, it can be easily accessed in the continuous deployment pipeline as we will see in the next section.

Create a GitHub Action Pipeline
To create a continuous deployment pipeline visit the Actions tab in your GitHub repository. If you haven't enabled the Actions for the repository yet, check the Prerequisites section above.
There will be a lot of options to create a new workflow. But, we will be creating our workflow. To do so click the Select a workflow yourself link.

In the main.yaml file copy and paste the below code.
# Workflow name
name: Continuous Deployment

# This allows manual start of the pipeline as needed.
on: workflow_dispatch

# The list of jobs to run
jobs:
  build_and_deploy_job:
    runs-on: ubuntu-latest
    name: Build and Deploy Job
    steps:

      # 1. Configure AWS credentials
      - name: Configure AWS credentials
        uses: aws-actions/configure-aws-credentials@v2
        with:
          aws-access-key-id: ${{ secrets.AWS_ACCESS_KEY }}
          aws-secret-access-key: ${{ secrets.AWS_SECRET_ACCESS_KEY }}
          aws-region: ${{ secrets.AWS_REGION }}

      # 2. Checkout Repository
      - name: Checkout Repository
        uses: actions/checkout@v3
        with:
          ref: main

      # 3. Setup Node
      - name: Setup Node
        uses: actions/setup-node@v3
        with:
          node-version: '18.12.0'

      # 4. Setup Cache
      - name: Setup Cache
        uses: actions/cache@v3
        with:
          path: ~/.npm
          key: ${{ runner.os }}-node-${{ hashFiles('**/package-lock.json') }}
          restore-keys: |
            ${{ runner.os }}-node-

      # 5. Build Angular
      - name: Build Angular Application
        run: |
          ls
          npm install -g @angular/cli
          npm install
          ng build

      # 6. Copy to S3 bucket.
      - name: Copy to S3 Bucket
        run: |
          aws s3 cp ./dist/* s3://daveops.co.in

      # 7. (Optional) Invalidate CloudFront
      - name: Invalidate CloudFront
        run: |
          aws cloudfront create-invalidation --distribution-id <CLOUDFRONT DISTRIBUTION ID> --paths "/*"
Here are the 7 steps in the build and deploy job mentioned above:
AWS Credentials: Fetch the AWS credentials from the GitHub Secrets and configure the pipeline to use these credentials.
Checkout Repository: Pull the main branch of the repository into the pipeline. The Angular build will be created from this branch, so replace the branch name as needed.
Setup Node: Set up the node version for the pipeline. At the time of writing this article version 18.12.0 was the latest LTS version.
Setup Cache: To avoid downloading all dependencies every time npm install is run, store the node_modules and other project files in a cache. Due to this, subsequent runs will be much faster.
Build Angular: This step essentially installs the Angular CLI, installs the dependencies, and finally creates a distribution folder for the Angular project.
Copy to S3 Bucket: Once the dist folder is created, copy it to the S3 bucket. Don’t forget to change the name of the bucket as required. Secondly, make sure the dist folder contains the index.html file. If not, alter the path of ‘./dist’ accordingly.
Invalidate CloudFront (Optional): If you have a CloudFront distribution, invalidate it with the below command. Replace the <CLOUDFRONT_DISTRIBUTION_ID> with your own CloudFront distribution id.
Run the pipeline!
It's time for your hard work to pay off.
Go to the GitHub Actions tab in the repository. A pipeline with the name Continuous Deployment will be visible under the All Workflows section.

Click on the Run workflow dropdown on the right and click the green Run workflow button.

Once the workflow starts it will take around 3 minutes to complete the build and deploy the Angular application to the S3 bucket.

Conclusion
Setting up the GitHub Actions & AWS might seem a daunting task at first. But, once set up, it transfers the responsibility of deployment from a human to a machine. This reduces human errors with faulty deployments and gives the confidence to deploy with less stress!
Hope you have enjoyed the tutorial. Please subscribe to the newsletter for many such articles to follow.


helps..thanks
So Helpful! Thanks a lot!